This week it really hit home why this challenge is called ONE project at a time.
Also, why I'm typically so meticulous with my planning. I AM a Civil Engineer, after all.
Unfortunately, I'm also a frazzled mom. That means that like it or not, my first job is to put out the fires.
The yard is a fire, sort of, and I'm excited to post more on that (and how it's NOT going exactly as planned), but in the meantime, I'm frantically turning my laundryroom into a temporary retirement home for my curmudgeonly old cat.
I just keep reminding myself that life is a marathon not a sprint....
In the spirit of the challenge, I will not post next week as everyone finishes up, but I'm cheering for you all from here!

Bringing Civility to Engineering and Engineering to Domesticity.
Thursday, April 30, 2015
Wednesday, April 29, 2015
Co-Op Preschool: Hosting Week 1 of 8
We participate in a co-op preschool in our neighborhood. Every month, we rotate houses and take turns coming up with activities and learning projects for our 2 year olds.
We hosted in December and in May it's our turn again!!
In December, we ended up hosting last minute, but I felt like we put together some really awesome activites for our group.
Our theme for December got a bit jumbled due to the last minute change, but this was the general outline:
Week 1: Field Trip to Mission San Juan Capistrano
Week 2: My Home
Week 3: Sharing and Meals
Week 4: Holiday Celebration
Week 1: Field Trip to San Juan Capistrano.
Field trips are the 'easy' week as far as planning goes. I thought the Mission would be a great place to take the kids, there is so much history there and it is in our backyards. Although our kids are pretty young to understand really anything about the mission, I still think there is tremendous value in exposing kids (and parents!) to local historic sites.


I think the kids around here study the Mission in 4th grade, so we've given our little guys a bit of a head start! ;) Besides, my kids thrive being outside and there are fish, and dirt and rocks at the very least!
We hosted in December and in May it's our turn again!!
In December, we ended up hosting last minute, but I felt like we put together some really awesome activites for our group.
Our theme for December got a bit jumbled due to the last minute change, but this was the general outline:
Week 1: Field Trip to Mission San Juan Capistrano
Week 2: My Home
Week 3: Sharing and Meals
Week 4: Holiday Celebration
Week 1: Field Trip to San Juan Capistrano.
Field trips are the 'easy' week as far as planning goes. I thought the Mission would be a great place to take the kids, there is so much history there and it is in our backyards. Although our kids are pretty young to understand really anything about the mission, I still think there is tremendous value in exposing kids (and parents!) to local historic sites.
I think the kids around here study the Mission in 4th grade, so we've given our little guys a bit of a head start! ;) Besides, my kids thrive being outside and there are fish, and dirt and rocks at the very least!
Thursday, April 23, 2015
One Room Challenge: Weak Week.
I am awful.

I have bad news. I didn't do a single thing on the bathroom this week.
But I have great news: it's time to redo our yard!
So while traveling this week (which is excuse number 1) we received final notice on the grant for our yard!
Our yard isn't a major overall, but it needs done. And it needs a decent amount of time and attention to get it done. So I'm faced with a dilemma, do I abandon the bathroom for the greener pastures of our yard? Do I try to do both? The yard has a time limit, so just waiting isn't really an option.
What to do??? Do I switch and try to get the yard done in the next two weeks?
Like last week, these people are probably doing much better than I am!
Tuesday, April 21, 2015
For Sale by Owner, I don't need this crap and honeslty, neither do you.
And I wonder why I can't sell my stuff on sale sites...


Thursday, April 16, 2015
One Room Challenge: Week 3: fail.
I decided to tackle the boys bathroom as part of the One Room Challenge.
This week, my original goals were to complete the painting, adress the mirrors and choose some accessories.
Ya, but instead I did this:
Ya, but instead I did this:
 |
| This is a picture of nothing. |
To be fair, I didn't actually do nothing. I hosted out of town guests, helped coordinate a party, worked, and I even weaned my baby!
But I didn't touch that bathroom. Actually, that's a lie. I kicked the pile of towels back in from my son's room where I'd stashed them while I painted (and mort importantly photographed) and then I proceeded to walk around them all week. I tripped over the can of sample paint that I'd left on the floor (twice). I caught my toddler pretending to brush his teeth with the mostly clean paint brush, and I did everything on my to do list while feeling guilty for not getting around to painting. (Not getting around to buying the paint was the primary problem.) If you want to see some people who are doing a much better job than me, click here.
But alas, that's life sometimes, right?
But to make it up, I'll leave you with a picture. I don't always make beautiful rooms, but I always make beautiful babies!
 |
Monday, April 13, 2015
Nine Reasons to be glad I'm done breastfeeding.
It is finished. We are weaned. So to help me overcome this milestone, I've come up with a list of things I'm super glad about being done breastfeeding.
1. I can eat and drink whatever I want.
Regarding diet, breastfeeding is kind of like pregnancy lite. Sure I COULD drink caffeine, and have wine, but that lingering fear is still there. So now it's time to eat and drink and be merry! There is something to be said about having to consult your boobs before making food and beverage choices.
2. Meds
"Please ask our doctor if you are Nursing, Pregnant or Could become Pregnant." Let's face it, the world is scared to mess with people when they are busy about the business of creating offspring. Cold Medicine? Call your Doctor. Pain medicine? Ask the Lactation Consultant. Tic Tacs, well, probably google it at least. It's kind of nice to not automatically be in the high risk category for every signle medication. Suddenly if I don't feel well, there's a medicine for that!
3. Decreased Stickiness
I have two boys, so the change in overall stickiness is relative. Still, slightly less sticky=good. Not only that, but I'm convinced breast milk stains clothing. Those stains are in incredibly awkward locations.
I have two boys, so the change in overall stickiness is relative. Still, slightly less sticky=good. Not only that, but I'm convinced breast milk stains clothing. Those stains are in incredibly awkward locations.
4. Clothing
I no longer have to be a creeper about choosing my clothing. Maybe it's just be because I'm a shirt down to nurse type of gal (nobody wants to unwittingly see what pregnancy with two big babies did to my midsection), but shopping for and choosing clothes while nursing is kind of creepy. Frequently, I've found myself in the sale section at Target ruthless tugging at necklines to check their 'accesability'. Creepy? Probably. But necessary. And now, no more! Hello high necked sweaters and unstretchy necklines! I missed you!
I no longer have to be a creeper about choosing my clothing. Maybe it's just be because I'm a shirt down to nurse type of gal (nobody wants to unwittingly see what pregnancy with two big babies did to my midsection), but shopping for and choosing clothes while nursing is kind of creepy. Frequently, I've found myself in the sale section at Target ruthless tugging at necklines to check their 'accesability'. Creepy? Probably. But necessary. And now, no more! Hello high necked sweaters and unstretchy necklines! I missed you!
5. My PJ's are back!
Along the same line as the above, no more easy access PJ's required. I'm back to sleeping in that T-shirt I stole from my husband during our first trip together. (Do the silk PJ's every Christmas mean you don't think it's cute anymore, honey??) Regardless, My PJ's are back!! So long nursing tanks!
6. Killing Your Pump
Perhaps the more sane either save their breast pump for a future baby, or sell it, or even donate it, but for me, it's time to kill my pump. I'm sick of you whispering your inane phrases to me, time to go full Office Space on you and your impossible to clean little pieces!
7. Surveying the Damage
I remember my LC telling me that it was pregnancy and birth, not breastfeeding, that created the wasteland out of what was once my safely jog in a snug tank top bosom. That might be true, but while breastfeeding, I had no way to really ascertain the true extent of the damage. Exit milk, enter reality.
8. Return to Regular Programing
I've heard rumos of people for whom breastfeeding serves as both a gate keeper for their cycle and a nifty form of (albeit unreliable) birth control. Not so much for me, but at least maybe we can get back to some sense of 'normal.'
9. A tangible sign that my baby is growing up.
It's a step towards my child's eventual full independence from me. From breathing, to eating, to walking, talking and applying for mortgages, one day he won't need me at all.
Wait! I'm not glad about that! Time to revisit number one and console myself with a glass of wine in my not sticky PJs.
Wait! I'm not glad about that! Time to revisit number one and console myself with a glass of wine in my not sticky PJs.
Thursday, April 9, 2015
One Room Challenge: Week 2
I decided to tackle the boys bathroom as part of the One Room Challenge.

This week, my original rough goals were to finalize my plan and schedule, and choose colors, paint and theme. You can see what others are doing here.
At the beginning of the week, I finalized my project schedule and and Goals and created a To-Do list
Theme:
When I chose the boy's bathroom, I already had one very small detail chosen. I'd picked up a cute wall decal at the store a while ago that I wanted to hang in the room. I liked the colors and it complimented both boys rooms. I thought the phrase was adorable.
I decided I'd roughly base my plan on these colors. I took a last minute trip to Target to pick up Easter baskets (that bunny is a slacker). While I was there, I wandered through the kids bathroom department and feel in love with a curtain. It didn't match my colors exactly, but I decided to give it a try. My wall color will be neutral, and finding a new curtain won't be a major setback if I dislike it later. So, for now, chevrons ins blues, greens, grey, and some highlight colors it is!

Color:
We've been trying to decide on paint colors for lots of spaces in our home. I love the cool greys, but my whole house is warm browns, so it's challenging. I decided to pick up a sample of a paint we still have up for debate in our bedroom: Revere Pewter. This room might be a good chance to explore the color before making a bigger commitment! I also decided I'm going to try some matte/gloss stripes, so I spent some time this week experimenting with that. Not sure I'm brave enough to do stripes and chevrons, although I saw some great examples of it.

Paint:
I didn't buy trim paint yet, but I intend to paint next week, so it's on the list!
Finalize/Outline Project Task Lists:
I did finalize my project list as well as creating a list of sub tasks for each. I won't bore you with the details (yet)
.png)
At the beginning of the week, I finalized my project schedule and and Goals and created a To-Do list
- Choose Theme
- Choose Colors
- Match/ Choose Trim paint
- Buy Paint
- Finalize Project List
- Outline Project Task Lists
Theme:
When I chose the boy's bathroom, I already had one very small detail chosen. I'd picked up a cute wall decal at the store a while ago that I wanted to hang in the room. I liked the colors and it complimented both boys rooms. I thought the phrase was adorable.
 |
| What else could a mother of boys wish for?? |
I decided I'd roughly base my plan on these colors. I took a last minute trip to Target to pick up Easter baskets (that bunny is a slacker). While I was there, I wandered through the kids bathroom department and feel in love with a curtain. It didn't match my colors exactly, but I decided to give it a try. My wall color will be neutral, and finding a new curtain won't be a major setback if I dislike it later. So, for now, chevrons ins blues, greens, grey, and some highlight colors it is!
Color:
We've been trying to decide on paint colors for lots of spaces in our home. I love the cool greys, but my whole house is warm browns, so it's challenging. I decided to pick up a sample of a paint we still have up for debate in our bedroom: Revere Pewter. This room might be a good chance to explore the color before making a bigger commitment! I also decided I'm going to try some matte/gloss stripes, so I spent some time this week experimenting with that. Not sure I'm brave enough to do stripes and chevrons, although I saw some great examples of it.
Paint:
I didn't buy trim paint yet, but I intend to paint next week, so it's on the list!
Finalize/Outline Project Task Lists:
I did finalize my project list as well as creating a list of sub tasks for each. I won't bore you with the details (yet)
- Make Bathroom accessible and easy to use for the boys
- Paint
- Frame Mirror
- Finish Stools
- Create Canvas
- Organize/kid proof bathroom cabinets
I'm exciting about how they came out and it was nice to jump in and actually finish something in the middle of doing mostly planning.
Wednesday, April 8, 2015
DIY hooded towel: Snuggly Towels for Snuggly Babies
There's nothing better than adorable babies after a bath. I thought it would be fun and sweet to make them new hooded towels since they are getting a bit bit for the baby ones. One of my mom's friends gave her a homemade hooded towel, so I decided to see if I could figure out how she did it.
The problem is, I don't have the towel (it lives at Grandma's house). So it became a slightly involved process to figure out how to make the towel come out like I intended.
I decided to try a contrasting towel for the hood. After making the towels, I'm undecided if I'd do a contrasting color again or not, as it draws a bit more attention to the seams and part of the towel body ends up acting as part of the hood on bigger kids. (Okay, I don't have bigger kids, so what I really mean is me!)
Each hooded towels needs one full size bath towel and half of a hand towel. I chose a contrasting towel that I could use for both boys. No waste!

I washed and ironed the towels. It was the first time in my life I've ever ironed a towel, but I'm glad I did. The seams on the edge of the towel smoothed out nicely and made sewing the seams much easier.
I measured and cut the hand towel in half.
 I pinned each eventual seam and assembled the towel. I didn't like how the hood matched up with the body of the towel, so I decided to fold over about 2 inches of the towel. At least it was just pinned, or I would have spent quite a bit of time ripping seams.
Next, I folded the 'right' side of the towel in and on itself and stitched the rough edges. I used a zig zag stitch on the hood fold, but decided on a regular stitch here.
Hood was done and it was time to attach it! Too keep everything even, I started by folding the towel in half and placing a pin at the midpoint. I attached the hood and pinned the middle, then both edges then added some pins in the middle
The only challenge I had was the few area with the towel had quite a few layers. My sewing machine is pretty basic and managed it fine, but I did have to slow down and help it along a little bit.

And that's it! The whole project including figuring out the extra hem took two episodes of Downton Abbey (I did pause twice when attaching the hoods.) If you can thread a machine, you can do this project. Super simple.
I tried and tried to get a picture of the boys in their towels, but it was just too hard to get a picture a decent picture of two naked, wet, slippery boys! But take my word fot it, they were adorable!

The problem is, I don't have the towel (it lives at Grandma's house). So it became a slightly involved process to figure out how to make the towel come out like I intended.
I decided to try a contrasting towel for the hood. After making the towels, I'm undecided if I'd do a contrasting color again or not, as it draws a bit more attention to the seams and part of the towel body ends up acting as part of the hood on bigger kids. (Okay, I don't have bigger kids, so what I really mean is me!)
Each hooded towels needs one full size bath towel and half of a hand towel. I chose a contrasting towel that I could use for both boys. No waste!
I washed and ironed the towels. It was the first time in my life I've ever ironed a towel, but I'm glad I did. The seams on the edge of the towel smoothed out nicely and made sewing the seams much easier.
I measured and cut the hand towel in half.
 | ||
| Pins for the fold on the hood. |
 |
Next, I folded the 'right' side of the towel in and on itself and stitched the rough edges. I used a zig zag stitch on the hood fold, but decided on a regular stitch here.
 | |
 |
| Pinning the Hood |
And that's it! The whole project including figuring out the extra hem took two episodes of Downton Abbey (I did pause twice when attaching the hoods.) If you can thread a machine, you can do this project. Super simple.
I tried and tried to get a picture of the boys in their towels, but it was just too hard to get a picture a decent picture of two naked, wet, slippery boys! But take my word fot it, they were adorable!
Friday, April 3, 2015
How to defeat your self imposed self control measures in 5 minutes.
Soda is bad for me. I get it, I really do. I should drink tea, or organic water or something instead.
So in order to make it more difficult for me to drink too much soda, I started keeping the soda in the cabinet, where it will stay nice and lukewarm and undrinkable. I put one in the fridge every few days and that's it. One cold soda.
Only then I really wanted a soda. And they were all lukewarm. Darn you yesterday Amy! Stop being so damn smart and on top of things and manipulative! (Can you manipulate yourself?) Sometimes I'm convinced that yesterday Amy is significantly smarter than today Amy, a scary trend, I admit.
Thanks to the internet, I found out you can chill a soda in 5 minutes. Even I can wait five minutes...

Best Part? Works with wine, too!!
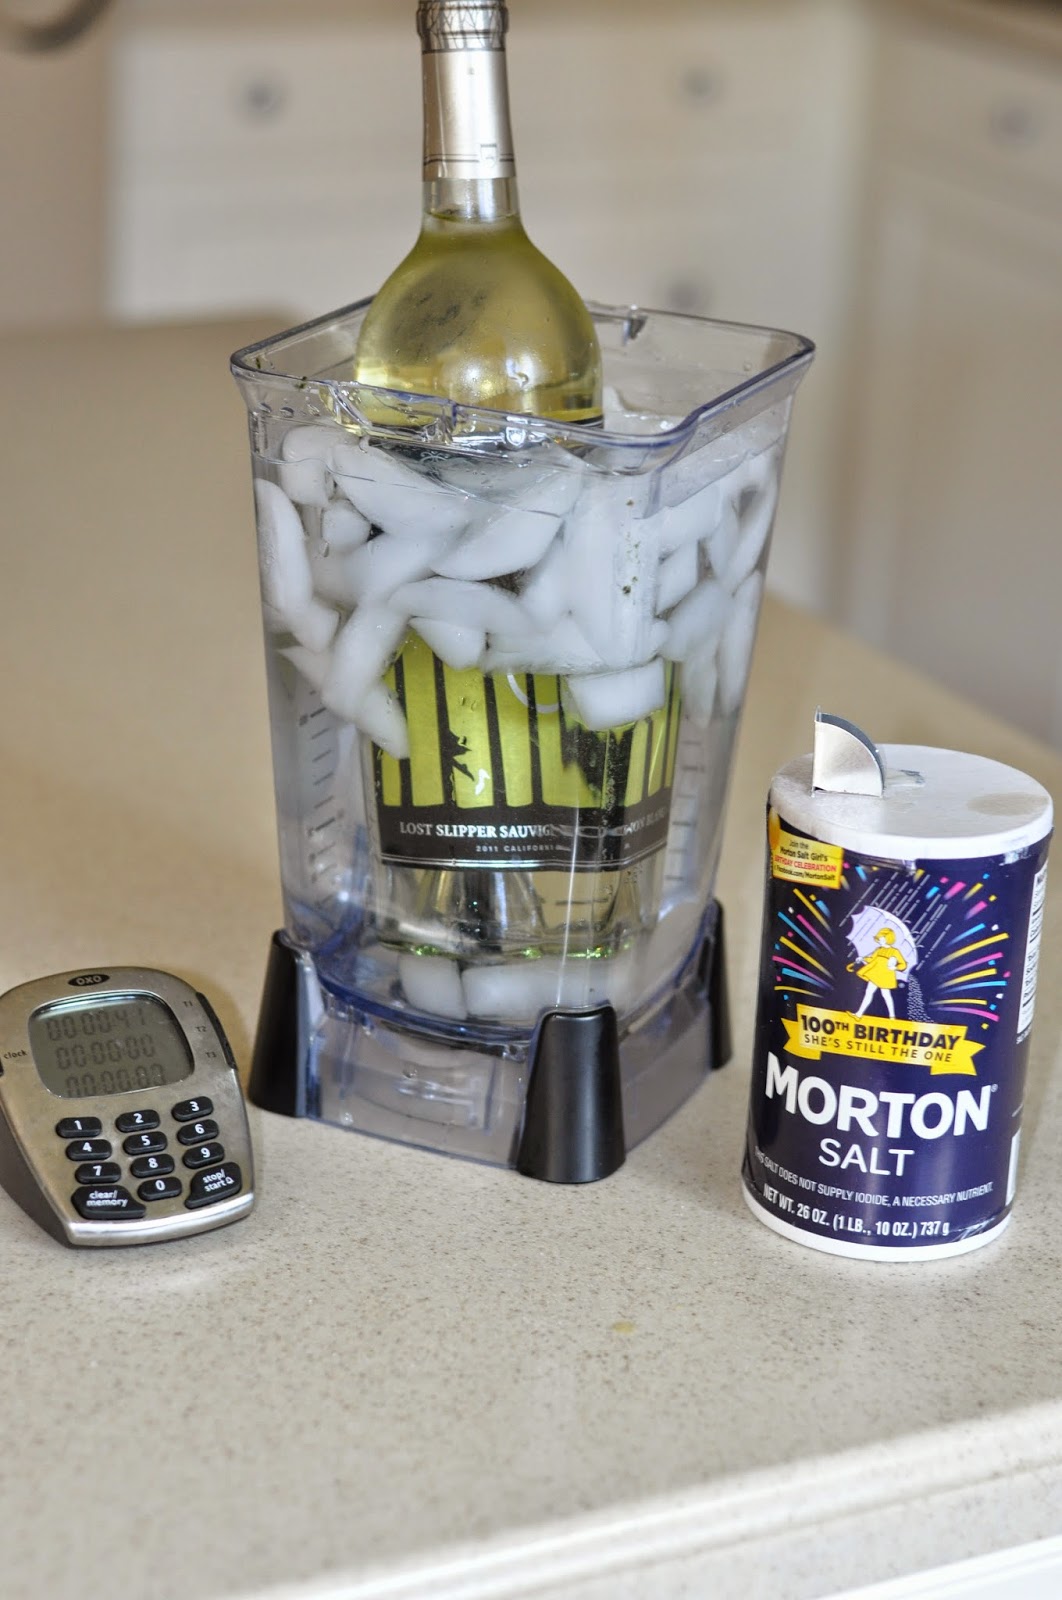
The problem is I don't know if I should wallow in self defeat or congratulate my ingenuity... I'll worry about that later. At the moment I'm busy trying to figure out how to outsmart Tomorrow Amy.
Also, in case you were wondering, Solution 2 is ice.
So in order to make it more difficult for me to drink too much soda, I started keeping the soda in the cabinet, where it will stay nice and lukewarm and undrinkable. I put one in the fridge every few days and that's it. One cold soda.
Only then I really wanted a soda. And they were all lukewarm. Darn you yesterday Amy! Stop being so damn smart and on top of things and manipulative! (Can you manipulate yourself?) Sometimes I'm convinced that yesterday Amy is significantly smarter than today Amy, a scary trend, I admit.
Thanks to the internet, I found out you can chill a soda in 5 minutes. Even I can wait five minutes...
Best Part? Works with wine, too!!
The problem is I don't know if I should wallow in self defeat or congratulate my ingenuity... I'll worry about that later. At the moment I'm busy trying to figure out how to outsmart Tomorrow Amy.
Also, in case you were wondering, Solution 2 is ice.
Thursday, April 2, 2015
One Room Challenge: The Boys Bathroom.
My boys are not yet one and almost two and a half and I'm already terrified of what will eventualy become of the Jack and Jill bathroom between their bedrooms. I have nighmares about the messes and smells associated with teenaged boys and a room accessible only via their bedrooms. I've warned by husband that I might just abandon the room altogether someday...
But thankfully, that day isn't today! To date, the boys bathroom is the least utilized room in our house. For years, before children, it say completed unused, except to be cleaned.
But with one child approaching potty training, things are changing rapidly for this space!

I decided to tackle this room because it doesn't need any great overall, and joining this challenge was a last minute decision. I think with a little bit of time and energy, I can give this room a little bit of freshing and address some of it's recently added uses.

My primary goal for this room is to make it easier to use for little people: step stools, child accessible towel racks, toy storage, etc.
Week 1: Finalize Plan, Choose Colors, Choose Paint and Theme
Week 2: Complete Paint, Address Mirrors, Choose Curtain and Towels
Week 3: Chose and purchase stools, hooks & Decor
Week 4: Complete Step Stools, additions, and address organization
Week 5: Completion!
In the meantime, I'm hoping the challenge will keep me moving along and I cansteal borrow lots of great ideas from the other participants on Calling it Home!


The biggest challenge I anticipate in this room is time. Because it's located between my kids rooms, my prime 'project time' (naps and after bedtime) won't work very well.
My current challenge is that my camera lens broke! I'm currently shooting with a fixed 50 mm lens, so I apologize for the photos as I get used to it and decide what to do about the broken lens.
But thankfully, that day isn't today! To date, the boys bathroom is the least utilized room in our house. For years, before children, it say completed unused, except to be cleaned.
But with one child approaching potty training, things are changing rapidly for this space!
I decided to tackle this room because it doesn't need any great overall, and joining this challenge was a last minute decision. I think with a little bit of time and energy, I can give this room a little bit of freshing and address some of it's recently added uses.
My primary goal for this room is to make it easier to use for little people: step stools, child accessible towel racks, toy storage, etc.
Week 1: Finalize Plan, Choose Colors, Choose Paint and Theme
Week 2: Complete Paint, Address Mirrors, Choose Curtain and Towels
Week 3: Chose and purchase stools, hooks & Decor
Week 4: Complete Step Stools, additions, and address organization
Week 5: Completion!
In the meantime, I'm hoping the challenge will keep me moving along and I can
The biggest challenge I anticipate in this room is time. Because it's located between my kids rooms, my prime 'project time' (naps and after bedtime) won't work very well.
My current challenge is that my camera lens broke! I'm currently shooting with a fixed 50 mm lens, so I apologize for the photos as I get used to it and decide what to do about the broken lens.
Subscribe to:
Posts (Atom)